
I present to you, DIY project meets West Elm style decor meets happy crafting time with my bff Jenna. Look what we did :)

Long story short, I’ve been dying to make something not only wedding-worthy but something you could use for home decor, and this idea swooshed on in to my little mind. I wasn’t sure initially how these tissue luminaries would turn out but the final product really exceeded my expectations. These beauties are now sitting on our fireplace mantle, pretty as can be :) So without further ado read on to find out how to make these super easy (but rather time consuming) DIY Tissue Covered Luminaries.

{Step 1} You’ll need to make a whole ton of tissue medallions with your craft punch. Like a whole lot. I punched 10 sheets at a time almost six rows across, so thankfully the process didn’t too take long to get the number I needed. But depending on the size of your vase and the number of vases you are covering, I would suggest 75 – 100 medallions per vase. Once you start gluing them to the vase, the last thing you will want to do is stop to punch more medallions. So punch lots up front.

{Step 2} Next up it’s time to make your glue paste! Make sure the water to glue ratio you use, results in a nice and thick mixture to the point where the mixture looks almost as white as watered down milk. I made one luminary after Jenna had left to go home from shooting this DIY, and the mixture didn’t have enough glue; by the time the tissue has dried, the medallions started to peel away from the vase. So glue it up! And make sure to really stir around your mixture to eliminate chunks.

{Step 3} Start covering your vase in tissue medallions. I found it easiest to start gluing on my medallions by holding the vase over my hand (like in the above photo; beware your hand will get sweaty :) Using your paint brush, paint on a thick layer of paste over a bottom section of your vase. Then using a tissue medallion that has been cut in half, start gluing on your first ‘line’ of medallions, carefully matching up the edges, and remembering to glue down each piece as you go.

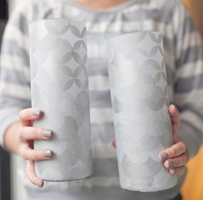
{Step 4} Continue gluing tissue medallions around the remainder of your vase until the entire thing is covered and painted in a coat of glue paste. If you hold your vase up to a window or light you will be able to see your pattern a bit better. You will need to use half pieces of tissue medallions to finish off the pattern around the top, in the same way you did when you started your pattern at the bottom. Make sure to set your luminaries aside to completely dry before putting candles inside. When they are dry, they look pretty spectacular, almost like a mermaid’s fin; the metallic colour of the tissue really looks awesome, like so:

But that doesn’t even compare to how these look when you drop a small pillar candle inside….

Out of all the DIY projects I’ve done, even Apb said he liked this one the best. As I type this these still sit on our mantle :)

I also made an attempt to create an ombre luminary but not only is it so tough to find tissue paper in diverse shades of colours, but the white (and the teal) tissue was so opaque you couldn’t even see the beautiful pattern on the vase. And the black was so dark, the luminary sort of lost it’s pizazz. I found the metallic tissue paper had the overall best look and biggest impact :)

Happy crafting bloggies, and enjoy your Wednesday :) xoxo