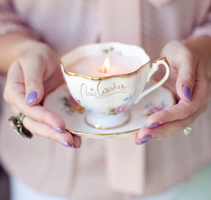

This may or may not be my most fave DIY project yet. It could be because I found the cutest little teacups to use like the one above that have ‘Best Wishes’ written in gold cursive or it could be because the ever so fabulous Jenna of Jenna McKenzie Photography took all of the beautiful shots for me just for this post (have I told you how much I heart her?) But really, I love this project cause I know you’re going to love it too. It’s easy, super cute and perfect for favors, home decor, gifts, bridal showers and the list goes on. Read on to find out how you too can make your own DIY Vintage Teacup Candles!

Supplies. You will need the following:
• vintage tea cups, any will do
• eco friendly candle wax flakes
• wooden kabob skewer sticks
• scotch tape and sharp scissors
• a stove, a double boiler and bowl
• oven mitts and a hot plate/trivet
{Step 1} You’ll want to make wooden wick supports to lay over top of the teacups. To do this you can tape together two wooden sticks at the end. Slide in a wax wick so it sits in between the two wooden sticks and then clamp shut the opposite ends and tape together. You should have two sticks taped together at both ends with a wax wick clamped into the middle. Position the wick into the center of the cup so the metal base around the wick is flush on the bottom of the cup. Repeat this step until all of your cups have a wooden wick support laying across the tops. Like so:

{Step 2} Fill a shallow pan or double boiler with water and put over medium to high stove heat. I used a glass Pampered Chef measuring bowl with a spout to melt my wax in. Place your bowl into the water and pour in your wax flakes. As the water and bowl begins to heat up your wax flakes will start to melt and become opaque/clear. I use two wooden skewers to stir the flakes especially after I added in my candle scent and colour. Candle dye is just as potent at food colouring; a little will go a long way!

{Step 3} Using oven mitts, use one hand to lift up the bowl out of the water (once the wax has completely melted) and the other hand to wipe off water on the outside of the bowl (don’t burn yourself!) Have a trivet ready beside your teacups and carefully pour the wax into your teacups, making sure to avoid the wooden skewers laying across the tops. You can always use one hand to hold the wood skewers in place. Fill the teacups up until about a quarter of an inch of cup is still showing. Immediately wash your bowl to avoid the wax drying or put back in your hot water bath if you will be melting more flakes.

{Step 4} Now you get to wait. So go grab some ice cream, hang out for a bit and let the wax completely dry. I’d say give it a few hours at least before you try to trim your wicks or light your candles. Once the wax looks cloudy, smooth and is hard to the touch (like an ordinary candle you’d light in your home) you’ll know the wax is dry. Using very sharp scissors, cut your wick directly at the wooden skewer clamp and gently pull the wooden skewers away from the wick. Then you can light your beautiful new Vintage Teacup Candles! This was by far the best part.

And there you have it! DIY Vintage Teacup Candles. All in all this project cost $40 (the Best Wishes cup was $12).

Best Wishes. Eeeek! I feel like this would be a perfect canvas in the new bigger and badder Girl Cave, no?

Oh and go over here and say Hi to Jenna. She’s a doll. And knows how to take a pretty picture :) Thanks Jenna! xoxo